1. Azure Container Registry
Learn how to use Azure Container Registry to store your container images, and automate builds and deployments.
Introduction
Azure Container Registry (ACR) is a managed, private Docker registry service based on the open-source Docker Registry 2.0. Create and maintain Azure container registries to store and manage your private Docker container images.
Learning objectives
- Explain the features and benefits Azure Container Registry offers
- Describe how to use ACR Tasks to automate builds and deployments
- Explain the elements in a Dockerfile
- Build and run an image in the ACR by using Azure CLI
Discover the Azure Container Registry — Like DockerHub
Use the Azure Container Registry (ACR) service with your existing container development and deployment pipelines, or use Azure Container Registry Tasks to build container images in Azure. Build on demand, or fully automate builds with triggers such as source code commits and base image updates.
Use cases
Pull images from an Azure container registry to various deployment targets:
-
Scalable orchestration systems that manage containerized applications across clusters of hosts, including Kubernetes, DC/OS, and Docker Swarm.
-
Azure services that support building and running applications at scale, including Azure Kubernetes Service (AKS), App Service, Batch, Service Fabric, and others.
Push to a container registry as part of a container development workflow. For example, target a container registry from a continuous integration and delivery tool such as Azure Pipelines or Jenkins.
Configure ACR Tasks to automatically rebuild application images when their base images are updated, or automate image builds when your team commits code to a Git repository.
Create multi-step tasks to automate building, testing, and patching multiple container images in parallel in the cloud.
Azure Container Registry service tiers
Azure Container Registry is available in multiple service tiers. These tiers provide predictable pricing and several options for aligning to the capacity and usage patterns of your private Docker registry in Azure.
| Tier | Description |
|---|---|
| Basic | A cost-optimized entry point for developers learning about Azure Container Registry. Basic registries have the same programmatic capabilities as Standard and Premium (such as Azure Active Directory authentication integration, image deletion, and webhooks). However, the included storage and image throughput are most appropriate for lower usage scenarios. |
| Standard | Standard registries offer the same capabilities as Basic, with increased included storage and image throughput. Standard registries should satisfy the needs of most production scenarios. |
| Premium | Premium registries provide the highest amount of included storage and concurrent operations, enabling high-volume scenarios. In addition to higher image throughput, Premium adds features such as geo-replication for managing a single registry across multiple regions, content trust for image tag signing, and private link with private endpoints to restrict access to the registry. |
Supported images and artifacts
Grouped in a repository, each image is a read-only snapshot of a Docker-compatible container. Azure container registries can include both Windows and Linux images. In addition to Docker container images, Azure Container Registry stores related content formats such as Helm charts and images built to the Open Container Initiative (OCI) Image Format Specification.
Automated image builds
Use Azure Container Registry Tasks (ACR Tasks) to streamline building, testing, pushing, and deploying images in Azure. Configure build tasks to automate your container OS and framework patching pipeline, and build images automatically when your team commits code to source control.
Explore storage capabilities
-
Encryption-at-rest: All container images in your registry are encrypted at rest. Azure automatically encrypts an image before storing it, and decrypts it on-the-fly when you or your applications and services pull the image.
-
Regional storage: Azure Container Registry stores data in the region where the registry is created, to help customers meet data residency and compliance requirements. In all regions except Brazil South and Southeast Asia, Azure may also store registry data in a paired region in the same geography. In the Brazil South and Southeast Asia regions, registry data is always confined to the region, to accommodate data residency requirements for those regions.
If a regional outage occurs, the registry data may become unavailable and isn't automatically recovered. Customers who wish to have their registry data stored in multiple regions for better performance across different geographies or who wish to have resiliency in the event of a regional outage should enable geo-replication.
-
Zone redundancy: A feature of the Premium service tier, zone redundancy uses Azure availability zones to replicate your registry to a minimum of three separate zones in each enabled region.
-
Scalable storage: Azure Container Registry allows you to create as many repositories, images, layers, or tags as you need, up to the registry storage limit.
💡 High numbers of repositories and tags can impact the performance of your registry.
Periodically delete unused repositories, tags, and images as part of your registry maintenance routine. Deleted registry resources like repositories, images, and tags can't be recovered after deletion.
ACR Tasks — Build + Manage containers
ACR Tasks is a suite of features within Azure Container Registry. It provides cloud-based container image building for platforms including Linux, Windows, and Azure Resource Manager, and can automate OS and framework patching for your Docker containers.
ACR Tasks enables automated builds triggered by source code updates, updates to a container's base image, or timers.
Task scenarios
ACR Tasks supports several scenarios to build and maintain container images and other artifacts.
-
Quick task - Build and push a single container image to a container registry on-demand, in Azure, without needing a local Docker Engine installation. Think
docker build,docker pushin the cloud. -
Automatically triggered tasks - Enable one or more triggers to build an image:
- Trigger on source code update
- Trigger on base image update
- Trigger on a schedule
-
Multi-step task - Extend the single image build-and-push capability of ACR Tasks with multi-step, multi-container-based workflows.
Each ACR Task has an associated source code context - the location of a set of source files used to build a container image or other artifact. Example contexts include a Git repository or a local filesystem.
Quick task
Before you commit your first line of code, ACR Tasks's quick task feature can provide an integrated development experience by offloading your container image builds to Azure. With quick tasks, you can verify your automated build definitions and catch potential problems prior to committing your code.
Using the familiar docker build format, the az acr build command in the Azure CLI takes a context (the set of files to build), sends it to ACR Tasks and, by default, pushes the built image to its registry upon completion.
Trigger task on source code update
Trigger a container image build or multi-step task when code is committed, or a pull request is made or updated, to a Git repository in GitHub or Azure DevOps Services. For example, configure a build task with the Azure CLI command az acr task create by specifying a Git repository and optionally a branch and Dockerfile. When your team updates code in the repository, an ACR Tasks-created webhook triggers a build of the container image defined in the repo.
Trigger on base image update
You can set up an ACR task to track a dependency on a base image when it builds an application image. When the updated base image is pushed to your registry, or a base image is updated in a public repo such as in Docker Hub, ACR Tasks can automatically build any application images based on it.
Schedule a task
Optionally schedule a task by setting up one or more timer triggers when you create or update the task. Scheduling a task is useful for running container workloads on a defined schedule, or running maintenance operations or tests on images pushed regularly to your registry.
Multi-step tasks
Multi-step tasks, defined in a YAML file specify individual build and push operations for container images or other artifacts. They can also define the execution of one or more containers, with each step using the container as its execution environment. For example, you can create a multi-step task that automates the following:
- Build a web application image
- Run the web application container
- Build a web application test image
- Run the web application test container, which performs tests against the running application container
- If the tests pass, build a Helm chart archive package
- Perform a
helm upgradeusing the new Helm chart archive package
Image platforms
By default, ACR Tasks builds images for the Linux OS and the amd64 architecture. Specify the --platform tag to build Windows images or Linux images for other architectures. Specify the OS and optionally a supported architecture in OS/architecture format (for example, --platform Linux/arm). For ARM architectures, optionally specify a variant in OS/architecture/variant format (for example, --platform Linux/arm64/v8):
| OS | Architecture |
|---|---|
| Linux | amd64 arm arm64 386 |
| Windows | amd64 |
Dockerfiles
A Dockerfile is a script that contains a series of instructions that are used to build a Docker image. Dockerfiles typically include the following information:
- The base or parent image we use to create the new image
- Commands to update the base OS and install other software
- Build artifacts to include, such as a developed application
- Services to expose, such a storage and network configuration
- Command to run when the container is launched
Create a Dockerfile
The first step in creating a Dockerfile is choosing a base image that serves as the foundation for your application. For example, if you're building a .NET application, you might choose a Microsoft .NET image as your base.
# Use the .NET 6 runtime as a base image
FROM mcr.microsoft.com/dotnet/runtime:6.0

# Set the working directory to /app
WORKDIR /app

# Copy the contents of the published app to the container's /app directory
COPY bin/Release/net6.0/publish/ .

# Expose port 80 to the outside world
EXPOSE 80

# Set the command to run when the container starts
CMD ["dotnet", "MyApp.dll"]
Let's go through each line to see what it does:
FROM mcr.microsoft.com/dotnet/runtime:6.0: This command sets the base image to the .NET 6 runtime, which is needed to run .NET 6 apps.WORKDIR /app: Sets the working directory to/app, which is where app files are copied.COPY bin/Release/net6.0/publish/ .: Copies the contents of the published app to the container's/appdirectory. We assume that the .NET 6 app has already been built and published to thebin/Release/net6.0/publishdirectory.EXPOSE 80: Exposes port 80, which is the default HTTP port, to the outside world. Change this line accordingly if your app listens on a different port.CMD ["dotnet", "MyApp.dll"]: The command to run when the container starts. In this case, we're running the dotnet command with the name of our app's DLL file (MyApp.dll). Change this line to match your apps name and entry point.
Each of these steps creates a cached container image as we build the final container image. These temporary images are layered on top of the previous and presented as single image once all steps complete.
2. Azure Container Instances

Azure Container Instances (ACI) offers the fastest and simplest way to run a container in Azure, without having to manage any virtual machines and without having to adopt a higher-level service.
Learning objectives
- Describe the benefits of Azure Container Instances and how resources are grouped.
- Deploy a container instance in Azure by using the Azure CLI.
- Start and stop containers using policies.
- Set environment variables in your container instances.
- Mount file shares in your container instances.
Explore Azure Container Instances
Azure Container Instances (ACI) is a great solution for any scenario that can operate in isolated containers, including simple applications, task automation, and build jobs. Here are some of the benefits:
- Fast startup: ACI can start containers in Azure in seconds, without the need to provision and manage VMs
- Container access: ACI enables exposing your container groups directly to the internet with an IP address and a fully qualified domain name (FQDN)
- Hypervisor-level security: Isolate your application as completely as it would be in a VM
- Customer data: The ACI service stores the minimum customer data required to ensure your container groups are running as expected
- Custom sizes: ACI provides optimum utilization by allowing exact specifications of CPU cores and memory
- Persistent storage: Mount Azure Files shares directly to a container to retrieve and persist state
- Linux and Windows: Schedule both Windows and Linux containers using the same API.
For scenarios where you need full container orchestration, including service discovery across multiple containers, automatic scaling, and coordinated application upgrades, we recommend Azure Kubernetes Service (AKS).
Container groups
The top-level resource in Azure Container Instances is the container group. A container group is a collection of containers that get scheduled on the same host machine. The containers in a container group share a lifecycle, resources, local network, and storage volumes. It's similar in concept to a pod in Kubernetes.
The following diagram shows an example of a container group that includes multiple containers:
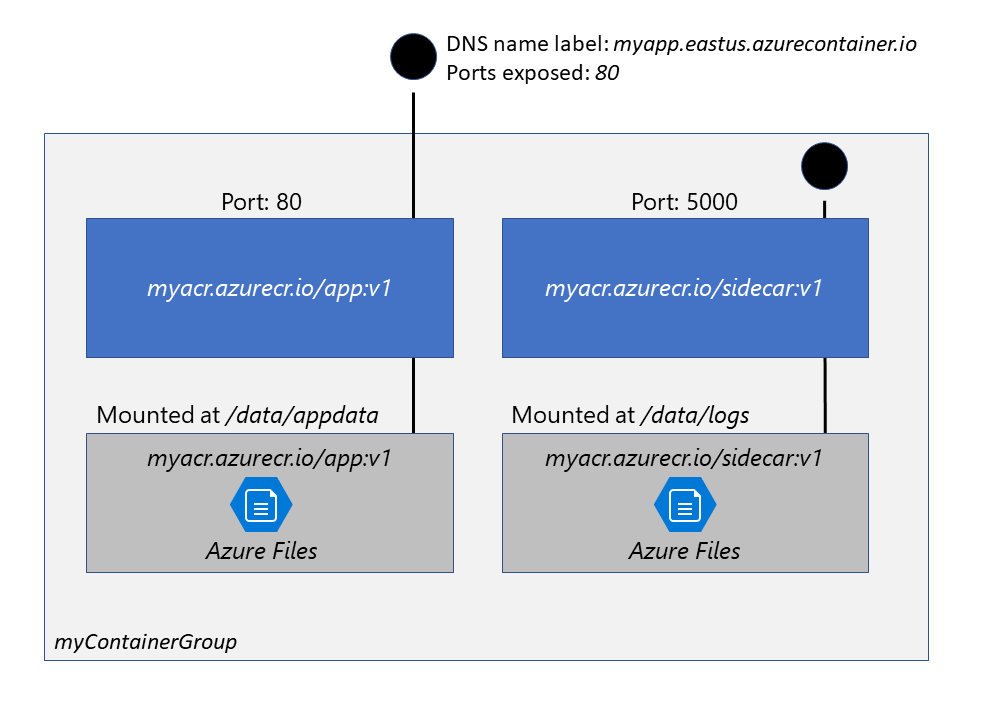
This example container group:
- Is scheduled on a single host machine.
- Is assigned a DNS name label.
- Exposes a single public IP address, with one exposed port.
- Consists of two containers. One container listens on port 80, while the other listens on port 5000.
- Includes two Azure file shares as volume mounts, and each container mounts one of the shares locally.
💡 Note
Multi-container groups currently support only Linux containers.
For Windows containers, Azure Container Instances only supports deployment of a single instance.
Deployment
There are two common ways to deploy a multi-container group: use a Resource Manager template or a YAML file. A Resource Manager template is recommended when you need to deploy additional Azure service resources (for example, an Azure Files share) when you deploy the container instances. Due to the YAML format's more concise nature, a YAML file is recommended when your deployment includes only container instances.
Resource allocation
Azure Container Instances allocates resources such as CPUs, memory, and optionally GPUs (preview) to a container group by adding the resource requests of the instances in the group. Using CPU resources as an example, if you create a container group with two instances, each requesting one CPU, then the container group is allocated two CPUs.
Networking
Container groups share an IP address and a port namespace on that IP address. To enable external clients to reach a container within the group, you must expose the port on the IP address and from the container. Because containers within the group share a port namespace, port mapping isn't supported. Containers within a group can reach each other via localhost on the ports that they've exposed, even if those ports aren't exposed externally on the group's IP address.
Storage
You can specify external volumes to mount within a container group. You can map those volumes into specific paths within the individual containers in a group. Supported volumes include:
- Azure file share
- Secret
- Empty directory
- Cloned git repo
Common scenarios
Multi-container groups are useful in cases where you want to divide a single functional task into a few container images. These images can then be delivered by different teams and have separate resource requirements.
Example usage could include:
- A container serving a web application and a container pulling the latest content from source control.
- An application container and a logging container. The logging container collects the logs and metrics output by the main application and writes them to long-term storage.
- An application container and a monitoring container. The monitoring container periodically makes a request to the application to ensure that it's running and responding correctly, and raises an alert if it's not.
- A front-end container and a back-end container. The front end might serve a web application, with the back end running a service to retrieve data.
Run containerized tasks with restart policies
The ease and speed of deploying containers in Azure Container Instances provides a compelling platform for executing run-once tasks like build, test, and image rendering in a container instance.
With a configurable restart policy, you can specify that your containers are stopped when their processes have completed. Because container instances are billed by the second, you're charged only for the compute resources used while the container executing your task is running.
Container restart policy
When you create a container group in Azure Container Instances, you can specify one of three restart policy settings.
| Restart policy | Description |
|---|---|
Always |
Containers in the container group are always restarted. This is the default setting applied when no restart policy is specified at container creation. |
Never |
Containers in the container group are never restarted. The containers run at most once. |
OnFailure |
Containers in the container group are restarted only when the process executed in the container fails (when it terminates with a nonzero exit code). The containers are run at least once. |
Specify a restart policy
Specify the --restart-policy parameter when you call az container create.
az container create \
    --resource-group myResourceGroup \
    --name mycontainer \
    --image mycontainerimage \
    --restart-policy OnFailure
Run to completion
Azure Container Instances starts the container, and then stops it when its application, or script, exits. When Azure Container Instances stops a container whose restart policy is Never or OnFailure, the container's status is set to Terminated
Set environment variables in container instances
Setting environment variables in your container instances allows you to provide dynamic configuration of the application or script run by the container. These environment variables are similar to the --env command-line argument to docker run.
If you need to pass secrets as environment variables, Azure Container Instances supports secure values for both Windows and Linux containers.
In the following example, two variables are passed to the container when it's created. The example is assuming you're running the CLI in a Bash shell or Cloud Shell, if you use the Windows Command Prompt, specify the variables with double-quotes, such as --environment-variables "NumWords"="5" "MinLength"="8".
az container create \
    --resource-group myResourceGroup \
    --name mycontainer2 \
    --image mcr.microsoft.com/azuredocs/aci-wordcount:latest
    --restart-policy OnFailure \
    --environment-variables 'NumWords'='5' 'MinLength'='8'\
Secure values (using YAML to create resource)
Objects with secure values are intended to hold sensitive information like passwords or keys for your application. Using secure values for environment variables is both safer and more flexible than including it in your container's image.
Environment variables with secure values aren't visible in your container's properties. Their values can be accessed only from within the container. For example, container properties viewed in the Azure portal or Azure CLI display only a secure variable's name, not its value.
Set a secure environment variable by specifying the secureValue property instead of the regular value for the variable's type. The two variables defined in the following YAML demonstrate the two variable types.
apiVersion: 2018-10-01
location: eastus
name: securetest
properties:
  containers:
  - name: mycontainer
    properties:
      environmentVariables:
        - name: 'NOTSECRET'
          value: 'my-exposed-value'
        - name: 'SECRET'
          secureValue: 'my-secret-value'
      image: nginx
      ports: []
      resources:
        requests:
          cpu: 1.0
          memoryInGB: 1.5
  osType: Linux
  restartPolicy: Always
tags: null
type: Microsoft.ContainerInstance/containerGroups
You would run the following command to deploy the container group with YAML:
az container create --resource-group myResourceGroup \
    --file secure-env.yaml \
Mount an Azure file share in Azure Container Instances
By default, Azure Container Instances are stateless. If the container crashes or stops, all of its state is lost. To persist state beyond the lifetime of the container, you must mount a volume from an external store. As shown in this unit, Azure Container Instances can mount an Azure file share created with Azure Files. Azure Files offers fully managed file shares in the cloud that are accessible via the industry standard Server Message Block (SMB) protocol.
Using an Azure file share with Azure Container Instances provides file-sharing features similar to using an Azure file share with Azure virtual machines.
Limitations
- You can only mount Azure Files shares to Linux containers.
- Azure file share volume mount requires the Linux container run as root.
- Azure File share volume mounts are limited to CIFS support.
Deploy container and mount volume
To mount an Azure file share as a volume in a container by using the Azure CLI, specify the share and volume mount point when you create the container with az container create. Following is an example of the command:
az container create \
    --resource-group $ACI_PERS_RESOURCE_GROUP \
    --name hellofiles \
    --image mcr.microsoft.com/azuredocs/aci-hellofiles \
    --dns-name-label aci-demo \
    --ports 80 \
    --azure-file-volume-account-name $ACI_PERS_STORAGE_ACCOUNT_NAME \
    --azure-file-volume-account-key $STORAGE_KEY \
    --azure-file-volume-share-name $ACI_PERS_SHARE_NAME \
    --azure-file-volume-mount-path /aci/logs/
The --dns-name-label value must be unique within the Azure region where you create the container instance. Update the value in the preceding command if you receive a DNS name label error message when you execute the command.
Deploy container and mount volume - YAML
You can also deploy a container group and mount a volume in a container with the Azure CLI and a YAML template. Deploying by YAML template is the preferred method when deploying container groups consisting of multiple containers.
The following YAML template defines a container group with one container created with the aci-hellofiles image. The container mounts the Azure file share acishare created previously as a volume. Following is an example YAML file.
apiVersion: '2019-12-01'
location: eastus
name: file-share-demo
properties:
  containers:
  - name: hellofiles
    properties:
      environmentVariables: []
      image: mcr.microsoft.com/azuredocs/aci-hellofiles
      ports:
      - port: 80
      resources:
        requests:
          cpu: 1.0
          memoryInGB: 1.5
      volumeMounts:
      - mountPath: /aci/logs/
        name: filesharevolume
  osType: Linux
  restartPolicy: Always
  ipAddress:
    type: Public
    ports:
      - port: 80
    dnsNameLabel: aci-demo
  volumes:
  - name: filesharevolume
    azureFile:
      sharename: acishare
      storageAccountName: <Storage account name>
      storageAccountKey: <Storage account key>
tags: {}
type: Microsoft.ContainerInstance/containerGroups
Mount multiple volumes
To mount multiple volumes in a container instance, you must deploy using an Azure Resource Manager template or a YAML file. To use a template or YAML file, provide the share details and define the volumes by populating the volumes array in the properties section of the template.
For example, if you created two Azure Files shares named share1 and share2 in storage account myStorageAccount, the volumes array in a Resource Manager template would appear similar to the following:
"volumes": [{
  "name": "myvolume1",
  "azureFile": {
    "shareName": "share1",
    "storageAccountName": "myStorageAccount",
    "storageAccountKey": "<storage-account-key>"
  }
},
{
  "name": "myvolume2",
  "azureFile": {
    "shareName": "share2",
    "storageAccountName": "myStorageAccount",
    "storageAccountKey": "<storage-account-key>"
  }
}]
Next, for each container in the container group in which you'd like to mount the volumes, populate the volumeMounts array in the properties section of the container definition. For example, this mounts the two volumes, myvolume1 and myvolume2, previously defined:
"volumeMounts": [{
  "name": "myvolume1",
  "mountPath": "/mnt/share1/"
},
{
  "name": "myvolume2",
  "mountPath": "/mnt/share2/"
}]
3. Azure Container Apps

Azure Container Apps provides the flexibility you need with a serverless container service built for microservice applications and robust autoscaling capabilities without the overhead of managing complex infrastructure.
Learning objectives
- Describe the features benefits of Azure Container Apps
- Deploy container app in Azure by using the Azure CLI
- Utilize Azure Container Apps built-in authentication and authorization
- Create revisions and implement app secrets
Explore Azure Container Apps
Azure Container Apps enables you to run microservices and containerized applications on a serverless platform that runs on top of Azure Kubernetes Service.
Common uses of Azure Container Apps include:
- Deploying API endpoints
- Hosting background processing applications
- Handling event-driven processing
- Running microservices
What are microservices?
- Microservices are small, independent, and loosely coupled. A single small team of developers can write and maintain a service.
- Each service is a separate codebase, which can be managed by a small development team.
- Services can be deployed independently. A team can update an existing service without rebuilding and redeploying the entire application.
- Services are responsible for persisting their own data or external state. This differs from the traditional model, where a separate data layer handles data persistence.
- Services communicate with each other by using well-defined APIs. Internal implementation details of each service are hidden from other services.
- Supports polyglot programming. For example, services don't need to share the same technology stack, libraries, or frameworks.
Applications built on Azure Container Apps can dynamically scale based on:
- HTTP traffic, event-driven processing, CPU or memory load, and any KEDA-supported scaler.
With Azure Container Apps, you can:
- Run multiple container revisions and manage the container app's application lifecycle.
- Autoscale your apps based on any KEDA-supported scale trigger. Most applications can scale to zero. (Applications that scale on CPU or memory load can't scale to zero.)
- Enable HTTPS ingress without having to manage other Azure infrastructure.
- Split traffic across multiple versions of an application for Blue/Green deployments and A/B testing scenarios.
- Use internal ingress and service discovery for secure internal-only endpoints with built-in DNS-based service discovery.
- Build microservices with Dapr and access its rich set of APIs.
- Run containers from any registry, public or private, including Docker Hub and Azure Container Registry (ACR).
- Use the Azure CLI extension, Azure portal or ARM templates to manage your applications.
- Provide an existing virtual network when creating an environment for your container apps.
- Securely manage secrets directly in your application.
- Monitor logs using Azure Log Analytics.
Benefits
- Agility. Because microservices are deployed independently, it's easier to manage bug fixes and feature releases. You can update a service without redeploying the entire application, and roll back an update if something goes wrong. In many traditional applications, if a bug is found in one part of the application, it can block the entire release process. New features might be held up waiting for a bug fix to be integrated, tested, and published.
- Small, focused teams. A microservice should be small enough that a single feature team can build, test, and deploy it. Small team sizes promote greater agility. Large teams tend be less productive, because communication is slower, management overhead goes up, and agility diminishes.
- Small code base. In a monolithic application, there is a tendency over time for code dependencies to become tangled. Adding a new feature requires touching code in a lot of places. By not sharing code or data stores, a microservices architecture minimizes dependencies, and that makes it easier to add new features.
- Mix of technologies. Teams can pick the technology that best fits their service, using a mix of technology stacks as appropriate.
- Fault isolation. If an individual microservice becomes unavailable, it won't disrupt the entire application, as long as any upstream microservices are designed to handle faults correctly. For example, you can implement the Circuit Breaker pattern, or you can design your solution so that the microservices communicate with each other using asynchronous messaging patterns.
- Scalability. Services can be scaled independently, letting you scale out subsystems that require more resources, without scaling out the entire application. Using an orchestrator such as Kubernetes or Service Fabric, you can pack a higher density of services onto a single host, which allows for more efficient utilization of resources.
- Data isolation. It is much easier to perform schema updates, because only a single microservice is affected. In a monolithic application, schema updates can become very challenging, because different parts of the application might all touch the same data, making any alterations to the schema risky.
Disadvantages
- Complexity. A microservices application has more moving parts than the equivalent monolithic application. Each service is simpler, but the entire system as a whole is more complex.
- Development and testing. Writing a small service that relies on other dependent services requires a different approach than writing a traditional monolithic or layered application. Existing tools are not always designed to work with service dependencies. Refactoring across service boundaries can be difficult. It is also challenging to test service dependencies, especially when the application is evolving quickly.
- Lack of governance. The decentralized approach to building microservices has advantages, but it can also lead to problems. You might end up with so many different languages and frameworks that the application becomes hard to maintain. It might be useful to put some project-wide standards in place, without overly restricting teams' flexibility. This especially applies to cross-cutting functionality such as logging.
- Network congestion and latency. The use of many small, granular services can result in more interservice communication. Also, if the chain of service dependencies gets too long (service A calls B, which calls C...), the additional latency can become a problem. You will need to design APIs carefully. Avoid overly chatty APIs, think about serialization formats, and look for places to use asynchronous communication patterns like queue-based load leveling.
- Data integrity. With each microservice responsible for its own data persistence. As a result, data consistency can be a challenge. Embrace eventual consistency where possible.
- Management. To be successful with microservices requires a mature DevOps culture. Correlated logging across services can be challenging. Typically, logging must correlate multiple service calls for a single user operation.
- Versioning. Updates to a service must not break services that depend on it. Multiple services could be updated at any given time, so without careful design, you might have problems with backward or forward compatibility.
- Skill set. Microservices are highly distributed systems. Carefully evaluate whether the team has the skills and experience to be successful.
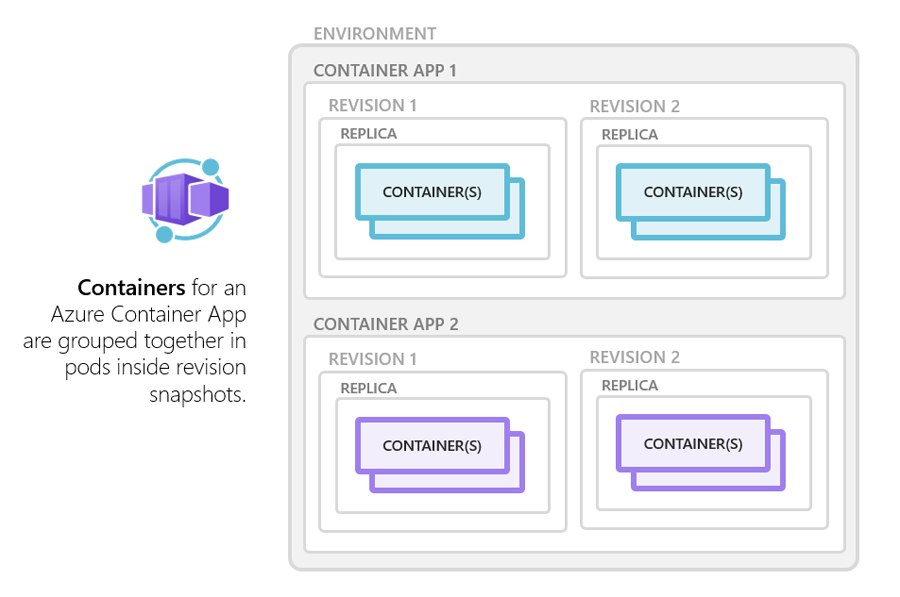
Azure Container Apps environments
Individual container apps are deployed to a single Container Apps environment, which acts as a secure boundary around groups of container apps. Container Apps in the same environment are deployed in the same virtual network and write logs to the same Log Analytics workspace. You may provide an existing virtual network when you create an environment.
Reasons to deploy container apps to the same environment include situations when you need to:
- Manage related services
- Deploy different applications to the same virtual network
- Instrument Dapr applications that communicate via the Dapr service invocation API
- Have applications to share the same Dapr configuration
- Have applications share the same log analytics workspace
Reasons to deploy container apps to different environments include situations when you want to ensure:
- Two applications never share the same compute resources
- Two Dapr applications can't communicate via the Dapr service invocation API
Microservices with Azure Container Apps
Microservice architectures allow you to independently develop, upgrade, version, and scale core areas of functionality in an overall system. Azure Container Apps provides the foundation for deploying microservices featuring:
- Independent scaling, versioning, and upgrades
- Service discovery
- Native Dapr integration
Dapr integration
When you implement a system composed of microservices, function calls are spread across the network. To support the distributed nature of microservices, you need to account for failures, retries, and timeouts.
While Container Apps features the building blocks for running microservices, use of Dapr provides an even richer microservices programming model.
Dapr includes features like:
- observability
- pub/sub
- service-to-service invocation with mutual TLS, retries, and more.
Deploy a Container App
Create an environment
An environment in Azure Container Apps creates a secure boundary around a group of container apps. Container Apps deployed to the same environment are deployed in the same virtual network and write logs to the same Log Analytics workspace.
-
Create an environment by using the
az containerapp env createcommand.az containerapp env create \ --name $myAppContEnv \ --resource-group $myRG \ --location $myLocation
Create a container app
After the container app environment finishes deployment, you can deploy a container image to Azure Container Apps.
-
Deploy a sample app container image by using the
containerapp createcommand.az containerapp create \ --name my-container-app \ --resource-group $myRG \ --environment $myAppContEnv \ --image mcr.microsoft.com/azuredocs/containerapps-helloworld:latest \ --target-port 80 \ --ingress 'external' \ --query properties.configuration.ingress.fqdn
By setting
--ingresstoexternal, you make the container app available to public requests.The command returns a link to access your app.
Explore containers in Azure Container Apps
Azure Container Apps manages the details of Kubernetes and container orchestration for you. Containers in Azure Container Apps can use any runtime, programming language, or development stack of your choice.
Azure Container Apps supports any Linux-based x86-64 (
linux/amd64) container image. There's no required base container image, and if a container crashes it automatically restarts.
Configuration
The following code is an example of the containers array in the properties.template section of a container app resource template. The excerpt shows some of the available configuration options when setting up a container when using Azure Resource Manager (ARM) templates. Changes to the template ARM configuration section trigger a new container app revision.
"containers": [
{
	"name": "main",
	"image": "[parameters('container_image')]",
    "env": [
      {
        "name": "HTTP_PORT",
        "value": "80"
      },
      {
        "name": "SECRET_VAL",
        "secretRef": "mysecret"
      }
    ],
    "resources": {
      "cpu": 0.5,
      "memory": "1Gi"
    },
    "volumeMounts": [
      {
        "mountPath": "/myfiles",
        "volumeName": "azure-files-volume"
      }
    ]
    "probes":[
        {
            "type":"liveness",
            "httpGet":{
            "path":"/health",
            "port":8080,
            "httpHeaders":[
                {
                    "name":"Custom-Header",
                    "value":"liveness probe"
                }]
            },
            "initialDelaySeconds":7,
            "periodSeconds":3

// file is truncated for brevity
Multiple containers
You can define multiple containers in a single container app to implement the sidecar pattern. The containers in a container app share hard disk and network resources and experience the same application lifecycle.
Sidecar pattern
Deploy components of an application into a separate process or container to provide isolation and encapsulation. This pattern can also enable applications to be composed of heterogeneous components and technologies.
This pattern is named Sidecar because it resembles a sidecar attached to a motorcycle. In the pattern, the sidecar is attached to a parent application and provides supporting features for the application. The sidecar also shares the same lifecycle as the parent application, being created and retired alongside the parent. The sidecar pattern is sometimes referred to as the sidekick pattern and is a decomposition pattern.
Context and problem
Applications and services often require related functionality, such as monitoring, logging, configuration, and networking services. These peripheral tasks can be implemented as separate components or services.
If they are tightly integrated into the application, they can run in the same process as the application, making efficient use of shared resources. However, this also means they are not well isolated, and an outage in one of these components can affect other components or the entire application. Also, they usually need to be implemented using the same language as the parent application. As a result, the component and the application have close interdependence on each other.

Examples of sidecar containers include:
- An agent that reads logs from the primary app container on a shared volume and forwards them to a logging service.
- A background process that refreshes a cache used by the primary app container in a shared volume.
⚠️ Note
Running multiple containers in a single container app is an advanced use case.
In most situations where you want to run multiple containers, such as when implementing a microservice architecture, deploy each service as a separate container app.
To run multiple containers in a container app, add more than one container in the containers array of the container app template.
Container registries
You can deploy images hosted on private registries by providing credentials in the Container Apps configuration.
To use a container registry, you define the required fields in registries array in the properties.configuration section of the container app resource template. The passwordSecretRef field identifies the name of the secret in the secrets array name where you defined the password.
{
  ...
  "registries": [{
    "server": "docker.io",
    "username": "my-registry-user-name",
    "passwordSecretRef": "my-password-secret-name"
  }]
}
With the registry information added, the saved credentials can be used to pull a container image from the private registry when your app is deployed.
Limitations
Azure Container Apps has the following limitations:
- Privileged containers: Azure Container Apps can't run privileged containers. If your program attempts to run a process that requires root access, the application inside the container experiences a runtime error.
- Operating system: Linux-based (
linux/amd64) container images are required.
Authentication & Authorization in Azure Container Apps
Azure Container Apps provides built-in authentication and authorization features to secure your external ingress-enabled container app with minimal or no code. The built-in authentication feature for Container Apps can save you time and effort by providing out-of-the-box authentication with federated identity providers, allowing you to focus on the rest of your application.
- Azure Container Apps provides access to various built-in authentication providers.
- The built-in auth features don’t require any particular language, SDK, security expertise, or even any code that you have to write.
This feature should only be used with HTTPS. Ensure allowInsecure is disabled on your container app's ingress configuration. You can configure your container app for authentication with or without restricting access to your site content and APIs.
- To restrict app access only to authenticated users, set its Restrict access setting to Require authentication.
- To authenticate but not restrict access, set its Restrict access setting to Allow unauthenticated access.
Identity providers
Container Apps uses federated identity, in which a third-party identity provider manages the user identities and authentication flow for you. The following identity providers are available by default:
| Provider | Sign-in endpoint | How-To guidance |
|---|---|---|
| Microsoft Identity Platform | /.auth/login/aad |
Microsoft Identity Platform |
/.auth/login/facebook |
||
| GitHub | /.auth/login/github |
GitHub |
/.auth/login/google |
||
/.auth/login/twitter |
||
| Any OpenID Connect provider | /.auth/login/<providerName> |
OpenID Connect |
When you use one of these providers, the sign-in endpoint is available for user authentication and authentication token validation from the provider. You can provide your users with any number of these provider options.
Feature architecture
The authentication and authorization middleware component is a feature of the platform that runs as a sidecar container on each replica in your application. When enabled, every incoming HTTP request passes through the security layer before being handled by your application.
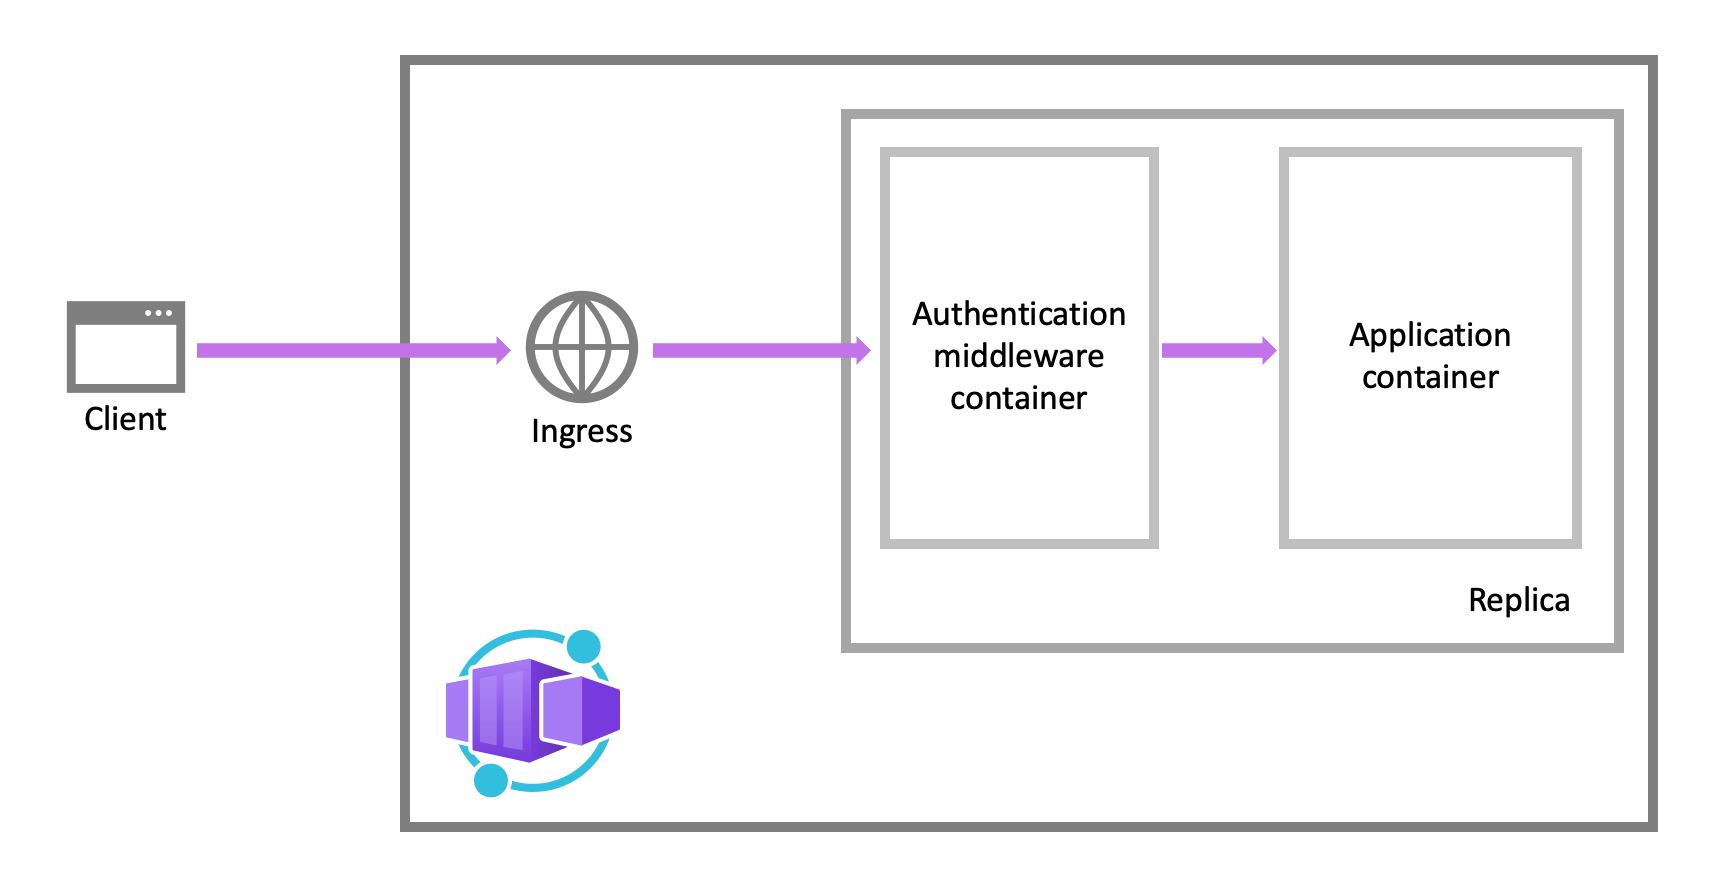
The platform middleware handles several things for your app:
- Authenticates users and clients with the specified identity provider(s)
- Manages the authenticated session
- Injects identity information into HTTP request headers
The authentication and authorization module runs in a separate container, isolated from your application code. As the security container doesn't run in-process, no direct integration with specific language frameworks is possible. However, relevant information your app needs is provided in request headers.
Authentication flow
The authentication flow is the same for all providers, but differs depending on whether you want to sign in with the provider's SDK:
-
Without provider SDK (server-directed flow or server flow): The application delegates federated sign-in to Container Apps. Delegation is typically the case with browser apps, which presents the provider's sign-in page to the user.
-
With provider SDK (client-directed flow or client flow): The application signs users in to the provider manually and then submits the authentication token to Container Apps for validation. This approach is typical for browser-less apps that don't present the provider's sign-in page to the user. An example is a native mobile app that signs users in using the provider's SDK.
Revisions and Secrets in Azure Container Apps
Azure Container Apps implements container app versioning by creating revisions. A revision is an immutable snapshot of a container app version. You can use revisions to release a new version of your app, or quickly revert to an earlier version of your app. New revisions are created when you update your application with revision-scope changes. You can also update your container app based on a specific revision.
You can control which revisions are active, and the external traffic that is routed to each active revision. Revision names are used to identify a revision, and in the revision's URL. You can customize the revision name by setting the revision suffix.
By default, Container Apps creates a unique revision name with a suffix consisting of a semi-random string of alphanumeric characters. For example, for a container app named album-api, setting the revision suffix name to 1st-revision would create a revision with the name album-api--1st-revision. You can set the revision suffix in the ARM template, through the Azure CLI az containerapp create and az containerapp update commands, or when creating a revision via the Azure portal.
Updating your container app
With the az containerapp update command you can modify environment variables, compute resources, scale parameters, and deploy a different image. If your container app update includes revision-scope changes, a new revision is generated.
az containerapp update \
  --name <APPLICATION_NAME> \
  --resource-group <RESOURCE_GROUP_NAME> \
  --image <IMAGE_NAME>
You can list all revisions associated with your container app with the az containerapp revision list command.
az containerapp revision list \
  --name <APPLICATION_NAME> \
  --resource-group <RESOURCE_GROUP_NAME> \
  -o table
For more information about Container Apps commands, visit the az containerapp reference.
Manage secrets in Azure Container Apps
Azure Container Apps allows your application to securely store sensitive configuration values. Once secrets are defined at the application level, secured values are available to container apps. Specifically, you can reference secured values inside scale rules.
- Secrets are scoped to an application, outside of any specific revision of an application.
- Adding, removing, or changing secrets doesn't generate new revisions.
- Each application revision can reference one or more secrets.
- Multiple revisions can reference the same secret(s).
An updated or deleted secret doesn't automatically affect existing revisions in your app. When a secret is updated or deleted, you can respond to changes in one of two ways:
- Deploy a new revision.
- Restart an existing revision.
Before you delete a secret, deploy a new revision that no longer references the old secret. Then deactivate all revisions that reference the secret.
❕Note
Container Apps doesn't support Azure Key Vault integration. Instead, enable managed identity in the container app and use the Key Vault SDK in your app to access secrets.
Defining secrets
When you create a container app, secrets are defined using the --secrets parameter.
- The parameter accepts a space-delimited set of name/value pairs.
- Each pair is delimited by an equals sign (
=).
In the example below a connection string to a queue storage account is declared in the --secrets parameter. The value for queue-connection-string comes from an environment variable named $CONNECTION_STRING.
az containerapp create \
  --resource-group "my-resource-group" \
  --name queuereader \
  --environment "my-environment-name" \
  --image demos/queuereader:v1 \
  --secrets "queue-connection-string=$CONNECTION_STRING"
After declaring secrets at the application level, you can reference them in environment variables when you create a new revision in your container app. When an environment variable references a secret, its value is populated with the value defined in the secret. To reference a secret in an environment variable in the Azure CLI, set its value to secretref:, followed by the name of the secret.
The following example shows an application that declares a connection string at the application level. This connection is referenced in a container environment variable.
az containerapp create \
  --resource-group "my-resource-group" \
  --name myQueueApp \
  --environment "my-environment-name" \
  --image demos/myQueueApp:v1 \
  --secrets "queue-connection-string=$CONNECTIONSTRING" \
  --env-vars "QueueName=myqueue" "ConnectionString=secretref:queue-connection-string"
Explore Dapr integration with Azure Container Apps
The Distributed Application Runtime (Dapr) is a set of incrementally adoptable features that simplify the authoring of distributed, microservice-based applications. Dapr provides capabilities for enabling application intercommunication through messaging via pub/sub or reliable and secure service-to-service calls.
Dapr is an open source, Cloud Native Computing Foundation (CNCF) project. The CNCF is part of the Linux Foundation and provides support, oversight, and direction for fast-growing, cloud native projects. As an alternative to deploying and managing the Dapr OSS project yourself, the Container Apps platform:
- Provides a managed and supported Dapr integration
- Handles Dapr version upgrades seamlessly
- Exposes a simplified Dapr interaction model to increase developer productivity
Dapr APIs
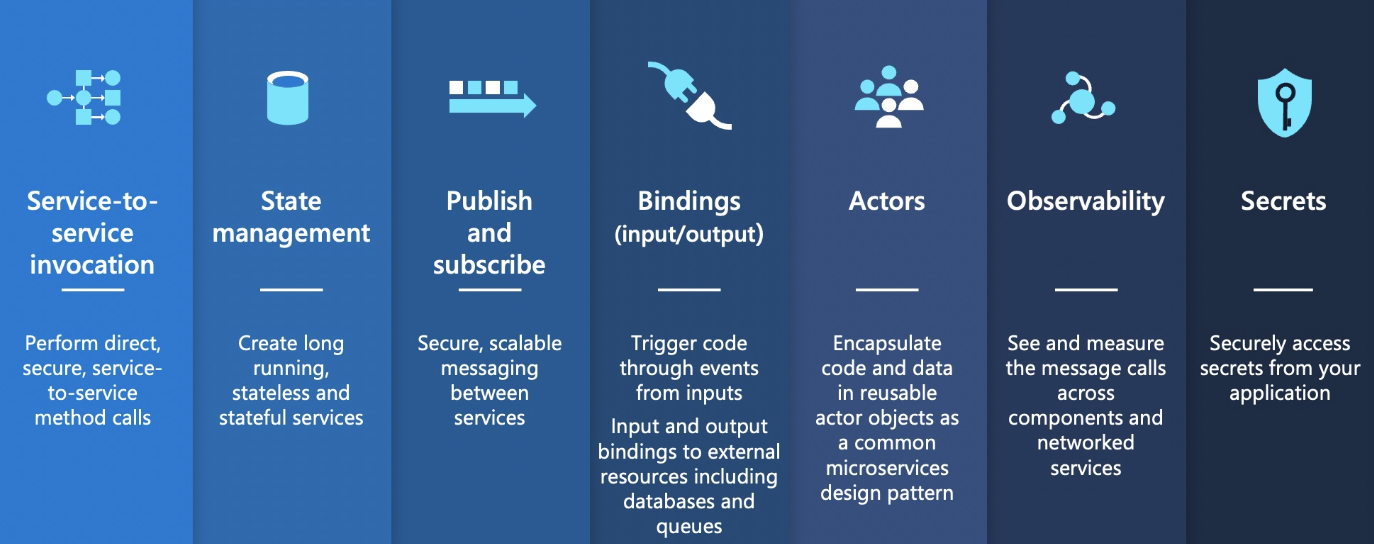
| Dapr API | Description |
|---|---|
| Service-to-service invocation | Discover services and perform reliable, direct service-to-service calls with automatic mTLS authentication and encryption. |
| State management | Provides state management capabilities for transactions and CRUD operations. |
| Pub/sub | Allows publisher and subscriber container apps to intercommunicate via an intermediary message broker. |
| Bindings | Trigger your applications based on events |
| Actors | Dapr actors are message-driven, single-threaded, units of work designed to quickly scale. For example, in burst-heavy workload situations. |
| Observability | Send tracing information to an Application Insights backend. |
| Secrets | Access secrets from your application code or reference secure values in your Dapr components. |
💡 Note
The table covers stable Dapr APIs. To learn more about using alpha APIs and features, visit limitations.
Dapr core concepts
The following example based on the Pub/sub API is used to illustrate core concepts related to Dapr in Azure Container Apps.
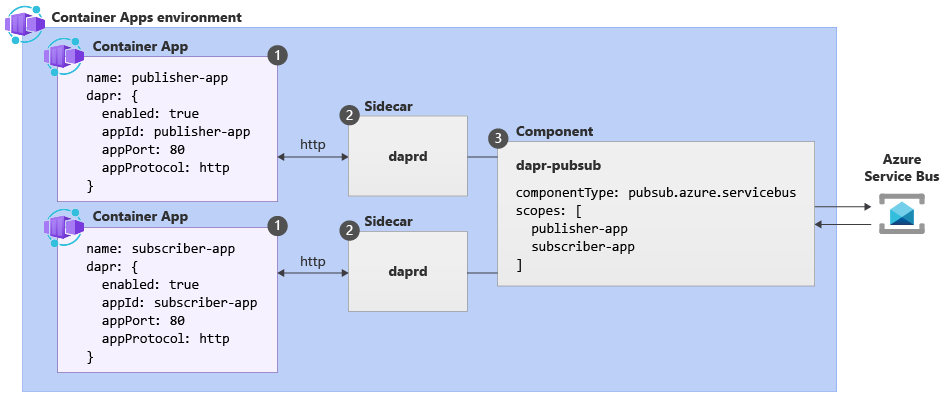
| Label | Dapr settings | Description |
|---|---|---|
| 1 | Container Apps with Dapr enabled | Dapr is enabled at the container app level by configuring a set of Dapr arguments. These values apply to all revisions of a given container app when running in multiple revisions mode. |
| 2 | Dapr | The fully managed Dapr APIs are exposed to each container app through a Dapr sidecar. The Dapr APIs can be invoked from your container app via HTTP or gRPC. The Dapr sidecar runs on HTTP port 3500 and gRPC port 50001. |
| 3 | Dapr component configuration | Dapr uses a modular design where functionality is delivered as a component. Dapr components can be shared across multiple container apps. The Dapr app identifiers provided in the scopes array dictate which dapr-enabled container apps load a given component at runtime. |
Dapr enablement
You can configure Dapr using various arguments and annotations based on the runtime context. Azure Container Apps provides three channels through which you can configure Dapr:
- Container Apps CLI
- Infrastructure as Code (IaC) templates, as in Bicep or Azure Resource Manager (ARM) templates
- The Azure portal
Dapr components and scopes
Dapr uses a modular design where functionality is delivered as a component. The use of Dapr components is optional and dictated exclusively by the needs of your application.
Dapr components in container apps are environment-level resources that:
- Can provide a pluggable abstraction model for connecting to supporting external services.
- Can be shared across container apps or scoped to specific container apps.
- Can use Dapr secrets to securely retrieve configuration metadata.
By default, all Dapr-enabled container apps within the same environment load the full set of deployed components. To ensure components are loaded at runtime by only the appropriate container apps, application scopes should be used.
4. Container Apps vs Container Instances vs Web Apps
There are many options for teams to build and deploy cloud native and containerized applications on Azure.
- Azure Container Apps
- Azure App Service
- Azure Container Instances
- Azure Kubernetes Service
- Azure Functions
- Azure Spring Apps
- Azure Red Hat OpenShift
There's no perfect solution for every use case and every team. The following explanation provides general guidance and recommendations as a starting point to help find the best fit for your team and your requirements.
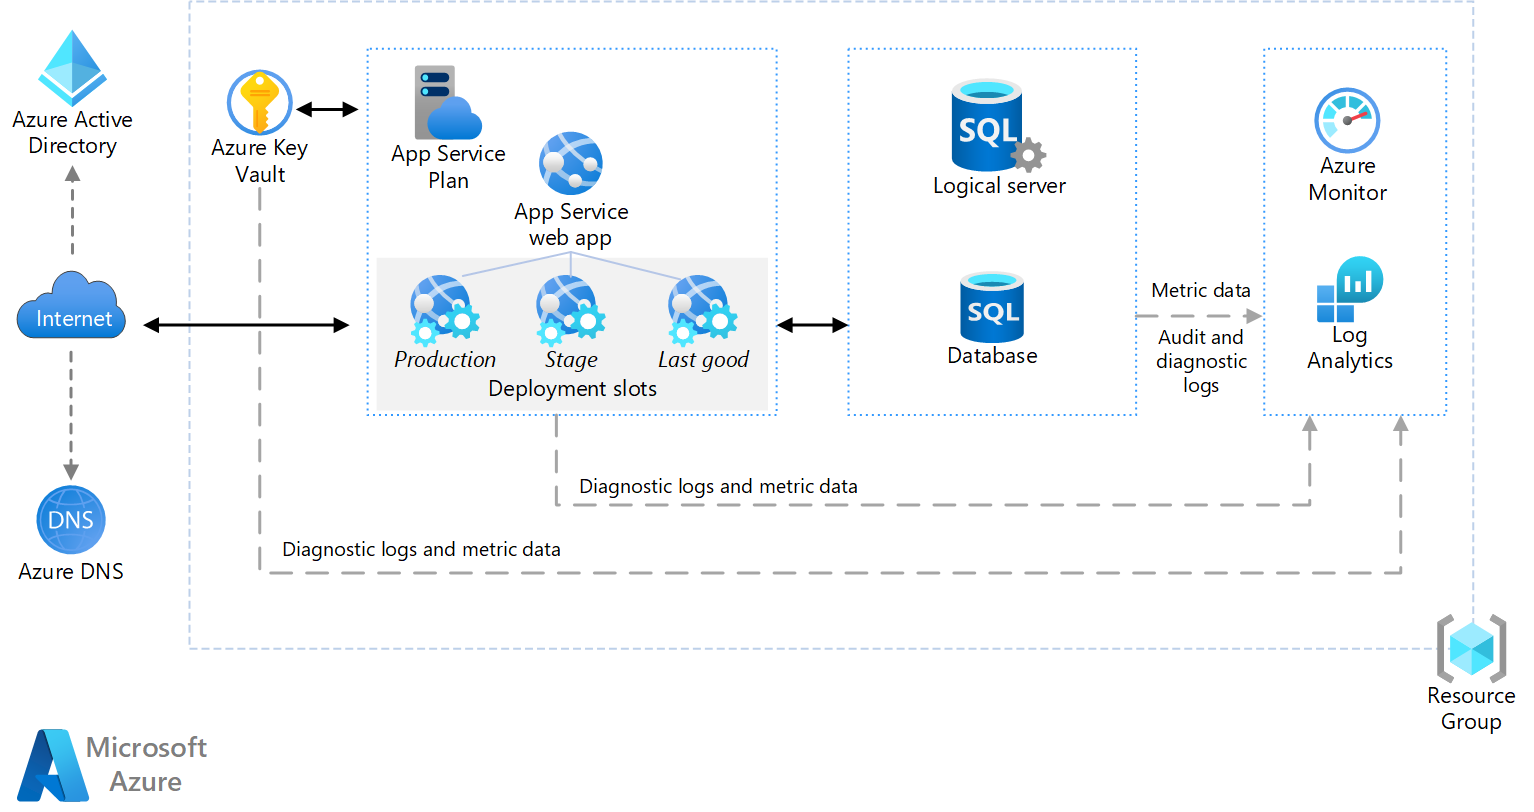
Azure App Service
Azure App Service provides fully managed hosting for web applications including websites and web APIs. These web applications may be deployed using code or containers. Azure App Service is optimized for web applications. Azure App Service is integrated with other Azure services including Azure Container Apps or Azure Functions. When building web apps, Azure App Service is an ideal option.
Example Architecture
Azure Container Apps
Azure Container Apps enables you to build serverless microservices and jobs based on containers. Distinctive features of Container Apps include:
- Optimized for running general purpose containers, especially for applications that span many microservices deployed in containers.
- Powered by Kubernetes and open-source technologies like Dapr, KEDA, and envoy.
- Supports Kubernetes-style apps and microservices with features like service discovery and traffic splitting.
- Enables event-driven application architectures by supporting scale based on traffic and pulling from event sources like queues, including scale to zero.
- Supports running on demand, scheduled, and event-driven jobs.
Azure Container Apps doesn't provide direct access to the underlying Kubernetes APIs. If you require access to the Kubernetes APIs and control plane, you should use Azure Kubernetes Service. However, if you would like to build Kubernetes-style applications and don't require direct access to all the native Kubernetes APIs and cluster management, Container Apps provides a fully managed experience based on best-practices. For these reasons, many teams may prefer to start building container microservices with Azure Container Apps.
You can get started building your first container app using the quickstarts.
Example Architecture
In this scenario, the container images are sourced from Azure Container Registry and deployed to a Container Apps environment.
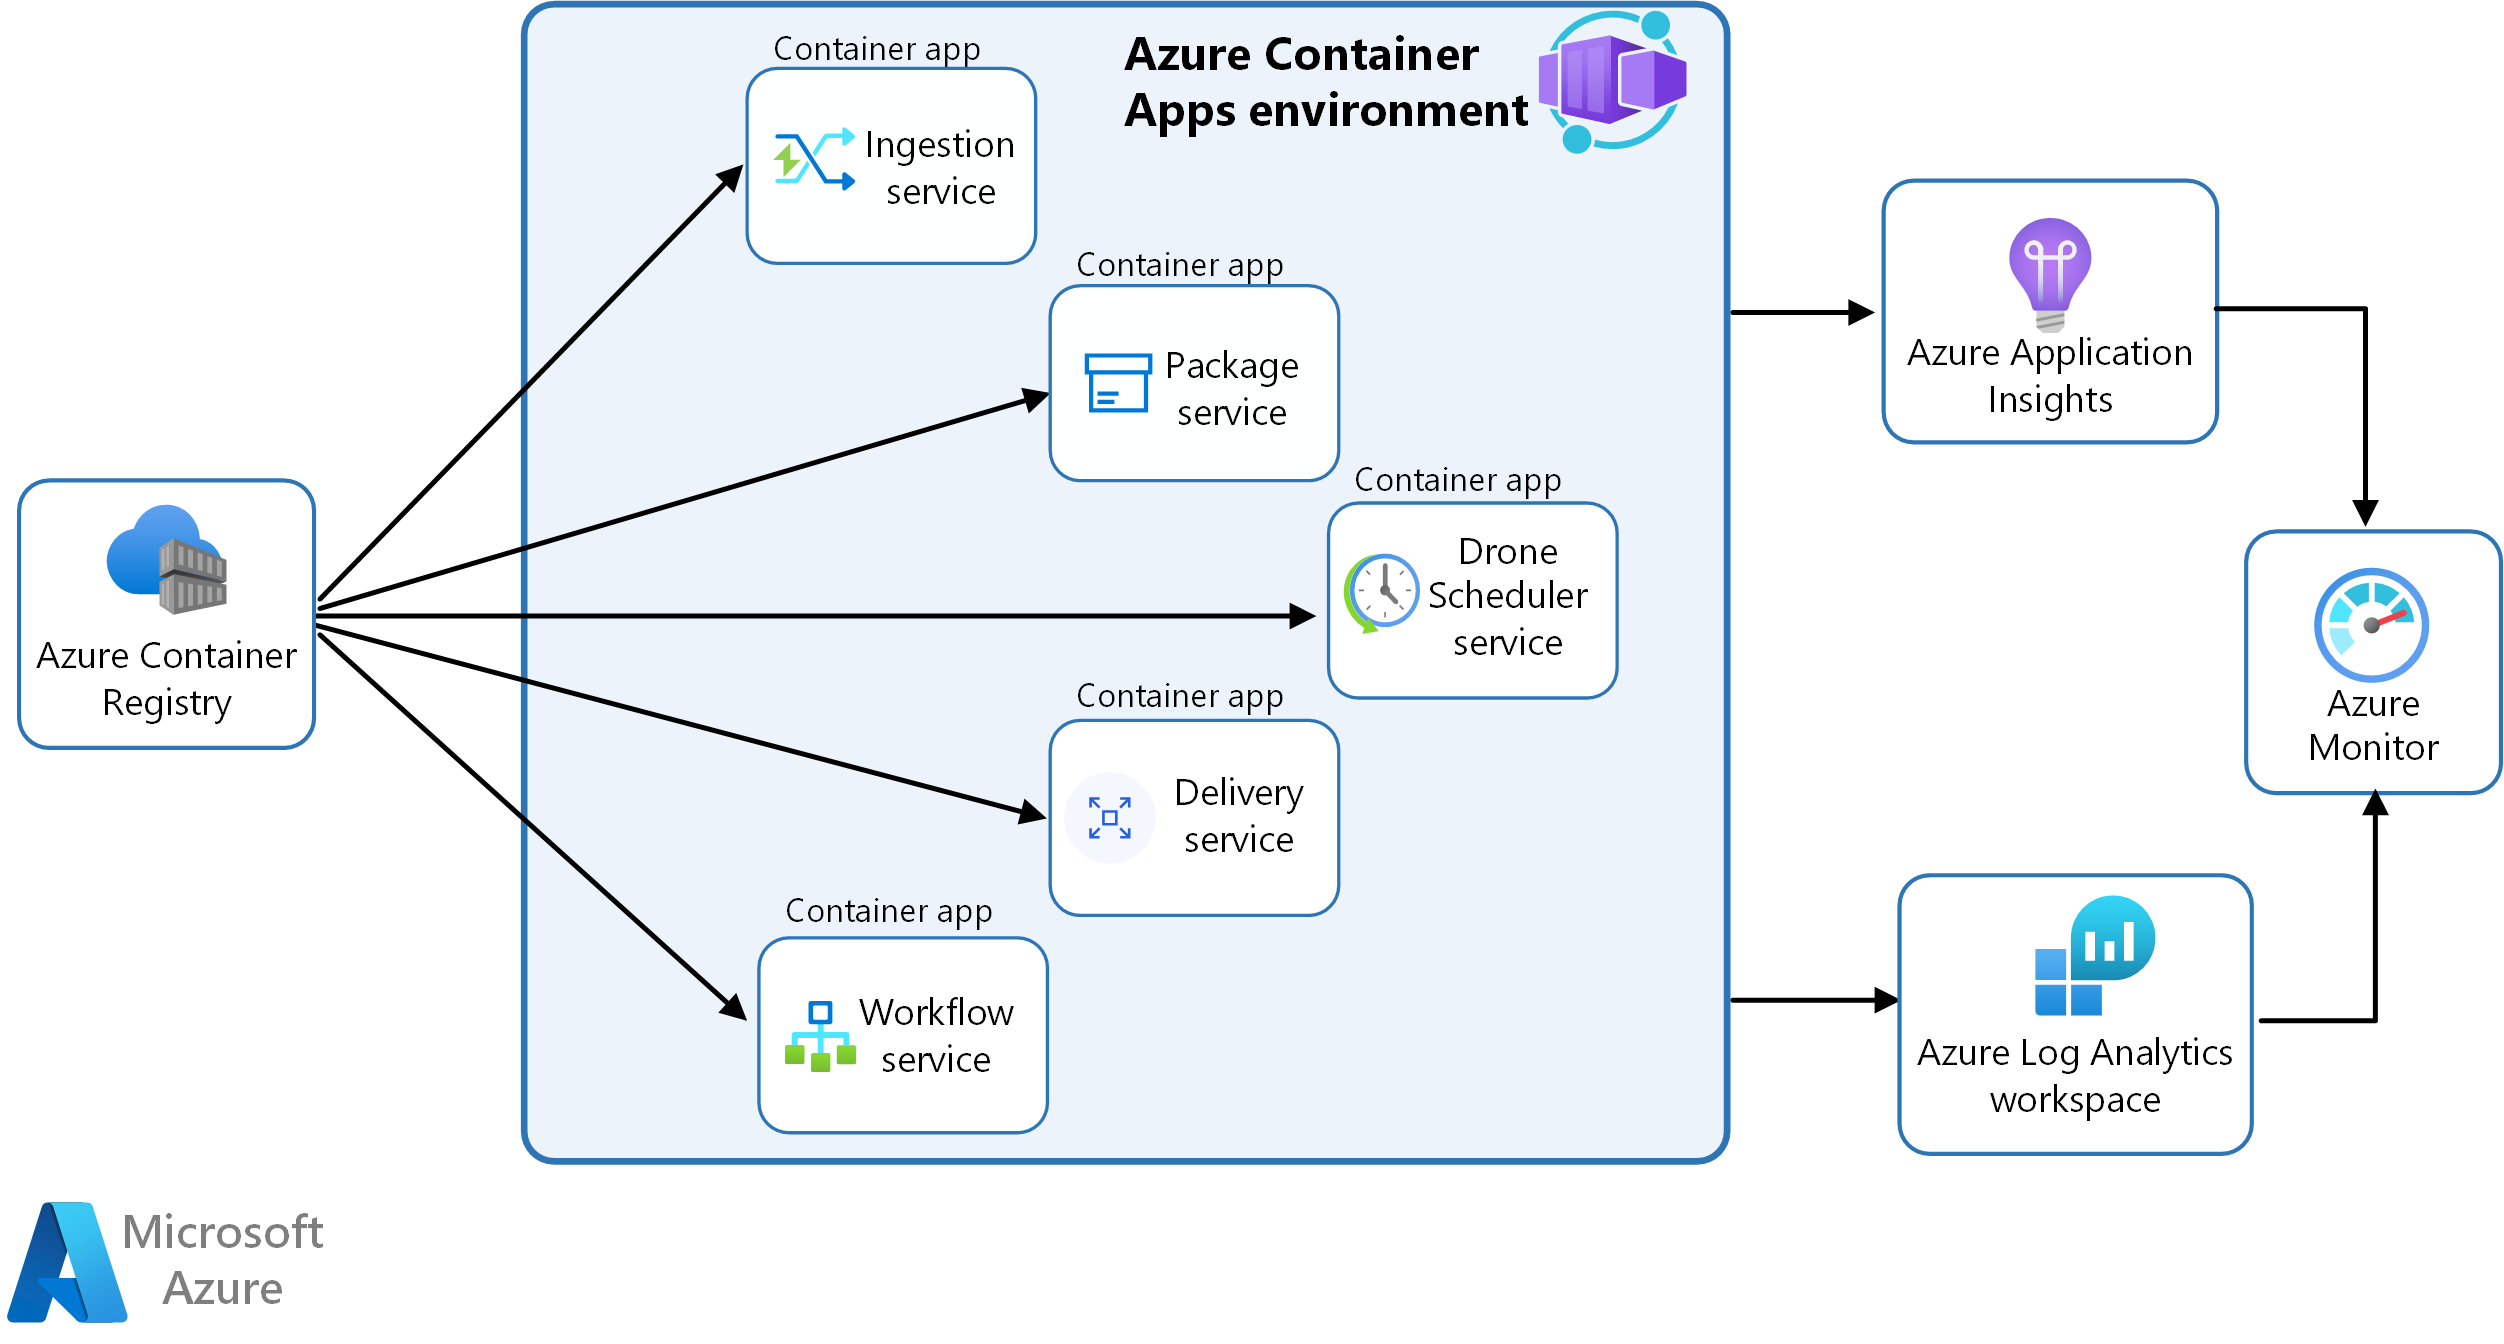
This diagram illustrates the runtime architecture for the solution:
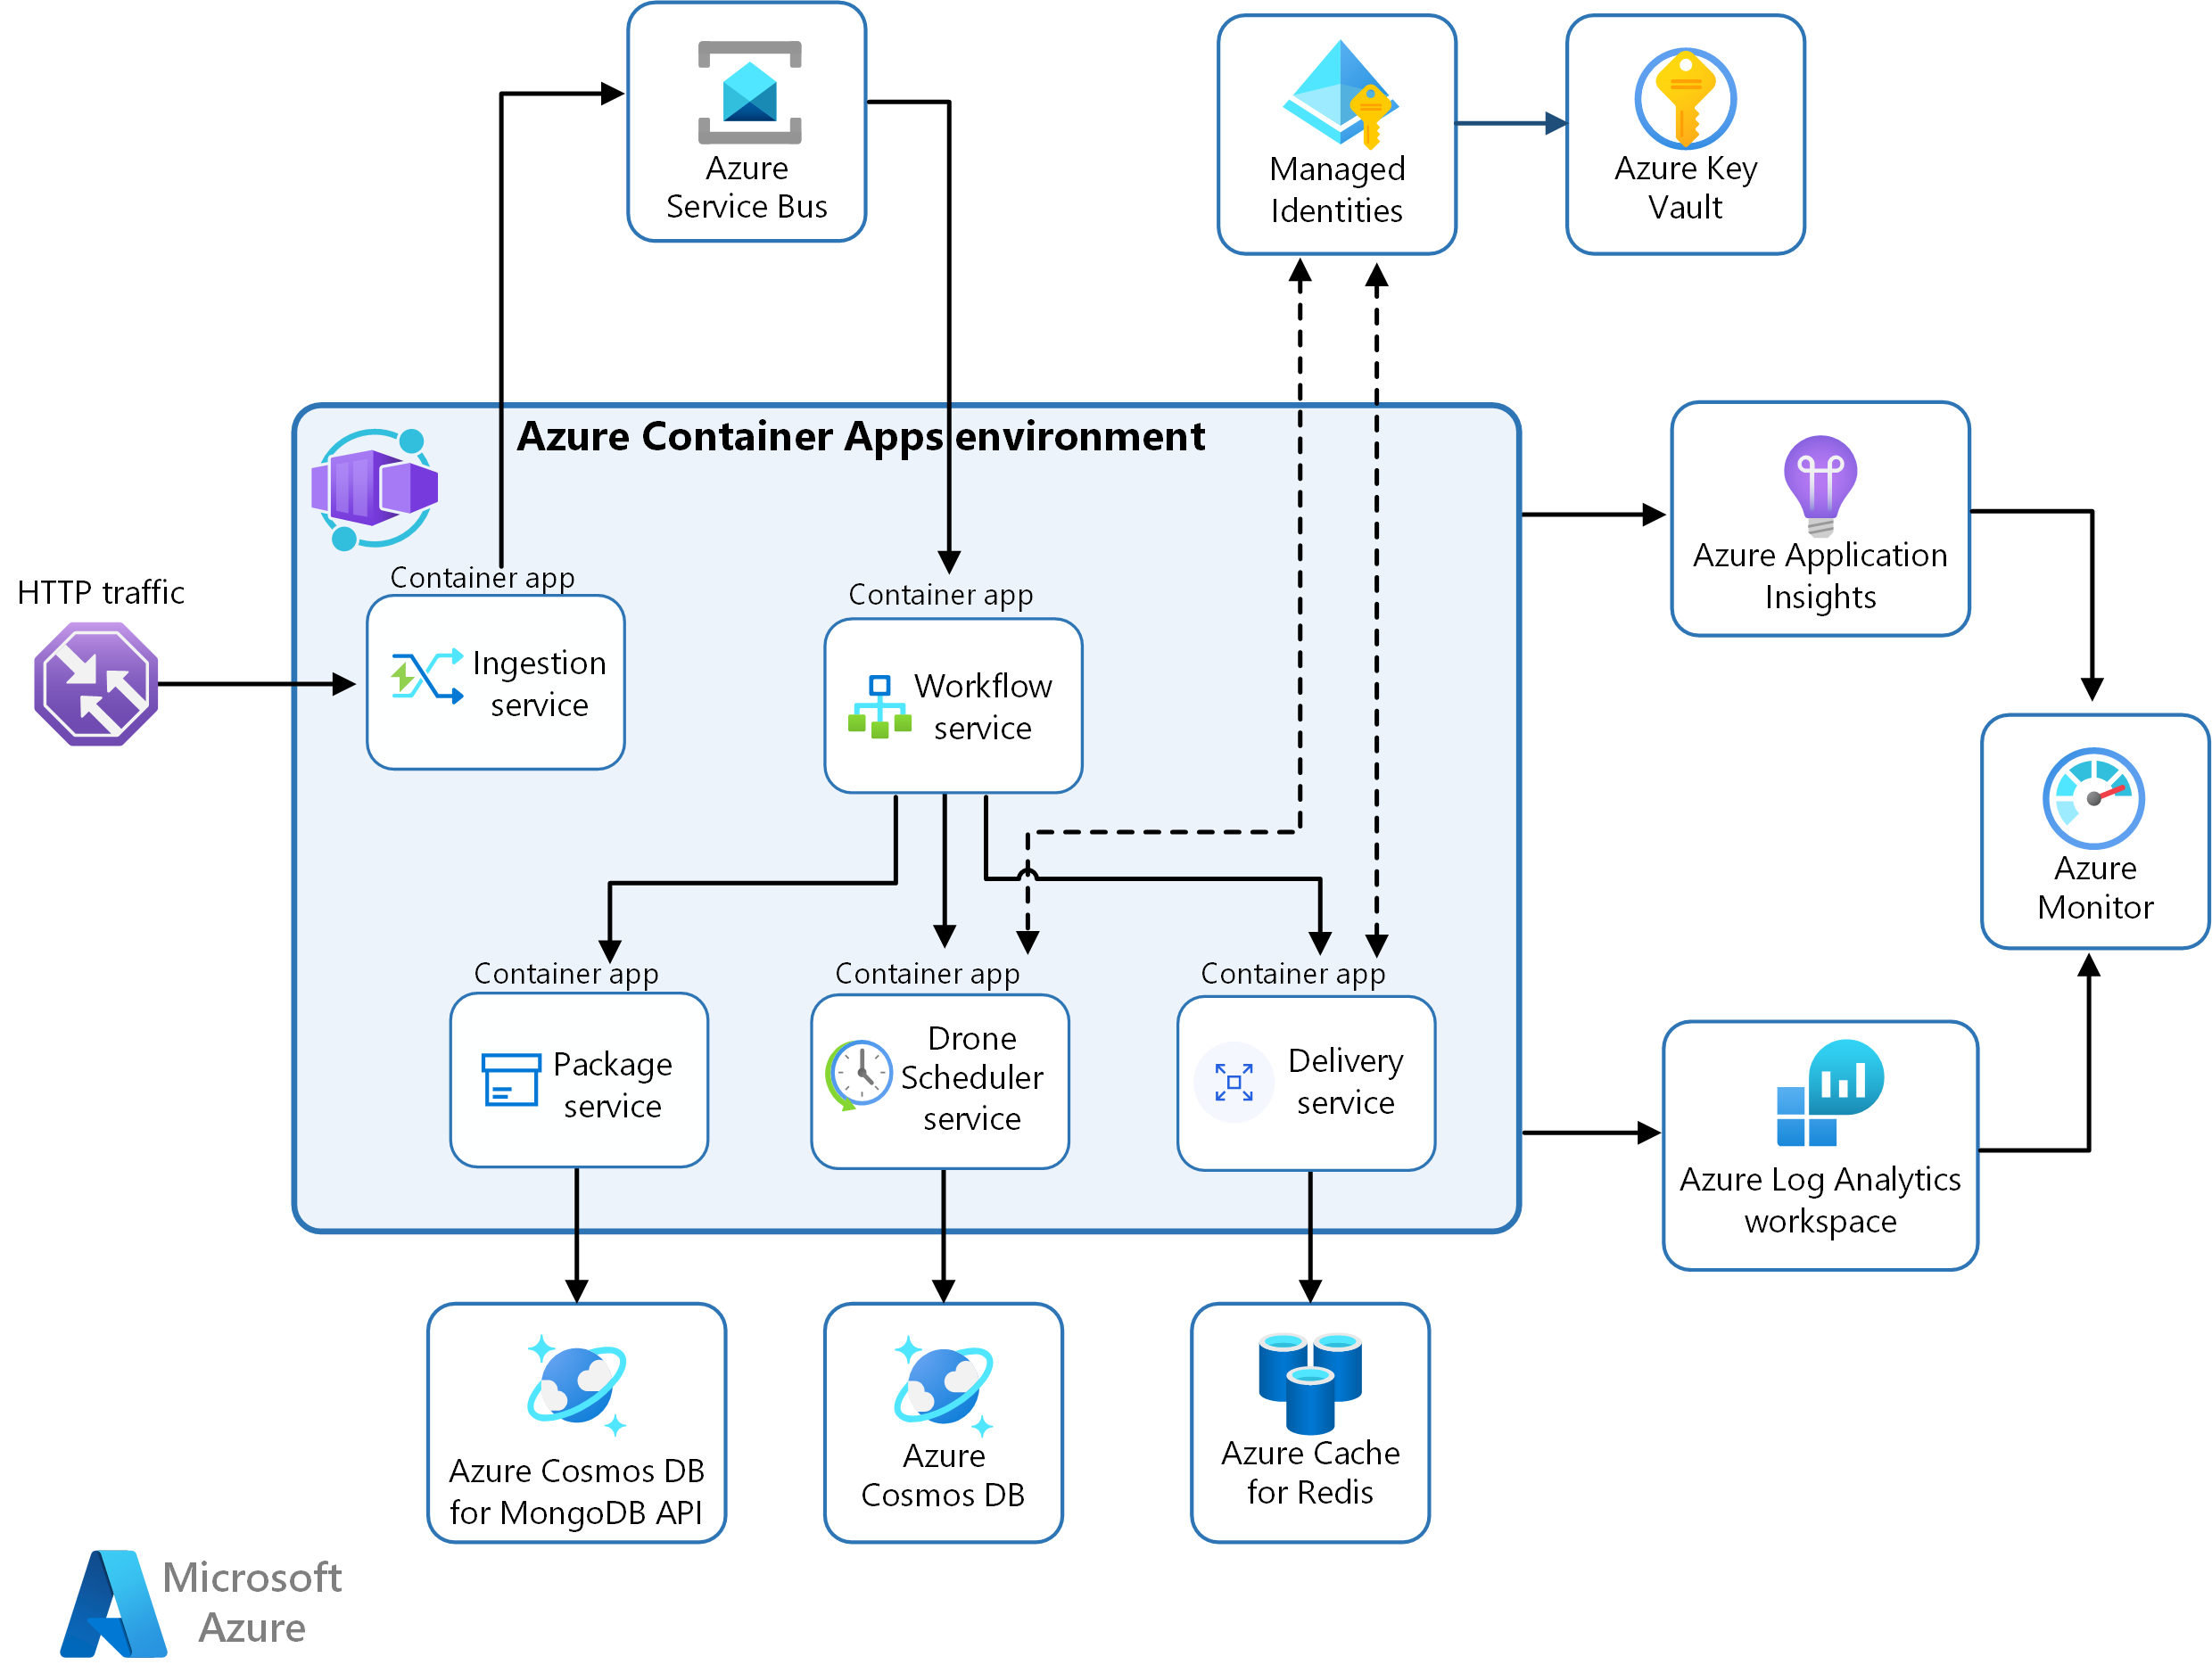
Azure Container Apps is the primary component.
Many of the complexities of the previous AKS architecture are replaced by these features:
- Built-in service discovery
- Fully managed HTTP and HTTP/2 endpoints
- Integrated load balancing
- Logging and monitoring
- Autoscaling based on HTTP traffic or events powered by KEDA
- Application upgrades and versioning
External storage and other components:
Azure Key Vault service for securely storing and accessing secrets, such as API keys, passwords, and certificates.
Azure Container Registry stores private container images. You can also use other container registries like Docker Hub.
Azure Cosmos DB stores data using the open-source Azure Cosmos DB for MongoDB. Microservices are typically stateless and write their state to external data stores. Azure Cosmos DB is a NoSQL database with open-source APIs for MongoDB and Cassandra.
Azure Service Bus offers reliable cloud messaging as a service and simple hybrid integration. Service Bus supports asynchronous messaging patterns that are common with microservices applications.
Azure Cache for Redis adds a caching layer to the application architecture to improve speed and performance for heavy traffic loads.
Azure Monitor collects and stores metrics and logs from the application. Use this data to monitor the application, set up alerts and dashboards, and do root cause analysis of failures. This scenario uses a Log Analytics workspace for comprehensive monitoring of the infrastructure and application.
Application Insights provides extensible application performance management (APM) and monitoring for the services. Each service is instrumented with the Application Insights SDK to monitor the app and direct the data to Azure Monitor.
Bicep Templates to configure and deploy the applications.
Azure Container Instances
Azure Container Instances (ACI) provides a single pod of Hyper-V isolated containers on demand. It can be thought of as a lower-level "building block" option compared to Container Apps. Concepts like scale, load balancing, and certificates are not provided with ACI containers. For example, to scale to five container instances, you create five distinct container instances. Azure Container Apps provide many application-specific concepts on top of containers, including certificates, revisions, scale, and environments. Users often interact with Azure Container Instances through other services. For example, Azure Kubernetes Service can layer orchestration and scale on top of ACI through virtual nodes. If you need a less "opinionated" building block that doesn't align with the scenarios Azure Container Apps is optimizing for, Azure Container Instances is an ideal option.
Typical uses for this architecture include:
- Web applications that have internal and external components that deploy both to the public cloud and on-premises by using shared container images.
- Modern deployment testing cycles with quality analysis, testing, development, or staging that's hosted on-premises and in the public cloud.
Azure Kubernetes Service
Azure Kubernetes Service (AKS) provides a fully managed Kubernetes option in Azure. It supports direct access to the Kubernetes API and runs any Kubernetes workload. The full cluster resides in your subscription, with the cluster configurations and operations within your control and responsibility. Teams looking for a fully managed version of Kubernetes in Azure, Azure Kubernetes Service is an ideal option.
Azure Functions
Azure Functions is a serverless Functions-as-a-Service (FaaS) solution. It's optimized for running event-driven applications using the functions programming model. It shares many characteristics with Azure Container Apps around scale and integration with events, but optimized for ephemeral functions deployed as either code or containers. The Azure Functions programming model provides productivity benefits for teams looking to trigger the execution of your functions on events and bind to other data sources. When building FaaS-style functions, Azure Functions is the ideal option. The Azure Functions programming model is available as a base container image, making it portable to other container based compute platforms allowing teams to reuse code as environment requirements change.